
Serving Jeddah & Makkah
Diagnostic & Surface Protection Guide — Post-Construction Handover Care15 min engineering & diagnostic readJeddah & Makkah

Post-Construction Marble & Porcelain Cleaning in Jeddah & Makkah: Removing Grout Haze, Gypsum & Paint Without Acid Damage

The complete technical reference for protecting your luxury finishes during new villa or apartment handover, resolving cloudy porcelain grout haze and contractor residues safely.

After months of construction or renovation and careful investment in natural marble slabs, large-format porcelain tiles, and designer sanitary ware, many villa and apartment owners in Jeddah and Makkah face a frustrating reality once contractors leave: floors covered in a stubborn chalky white film ("grout haze") that reappears moments after mopping, scattered gypsum plaster and paint splatters, cured silicone smears, and protective tapes baked hard onto aluminum window frames by intense sunlight.

It is at this exact handover stage that the most expensive property damage occurs—typically when untrained casual labor resorts to the fastest, cheapest shortcut: pouring raw hydrochloric acid (locally known as "Flash") onto floors and scraping surfaces with bare metal blades. Within minutes, raw acid liquid and its corrosive fumes permanently etch calcitic marble, burn out pigmented grout joints, and turn expensive chrome faucets and stainless steel drain covers black and pitted beyond repair.

This engineering guide provides a thorough diagnostic framework for every post-construction residue and architectural surface. It explains the critical chemical divergence between natural stone and porcelain, and demonstrates how a multi-stage protocol—combining HEPA dry extraction, calibrated single-disc mechanical scrubbing, and pH-balanced specialty chemistry—delivers a spotless handover without a single scratch or chemical burn.

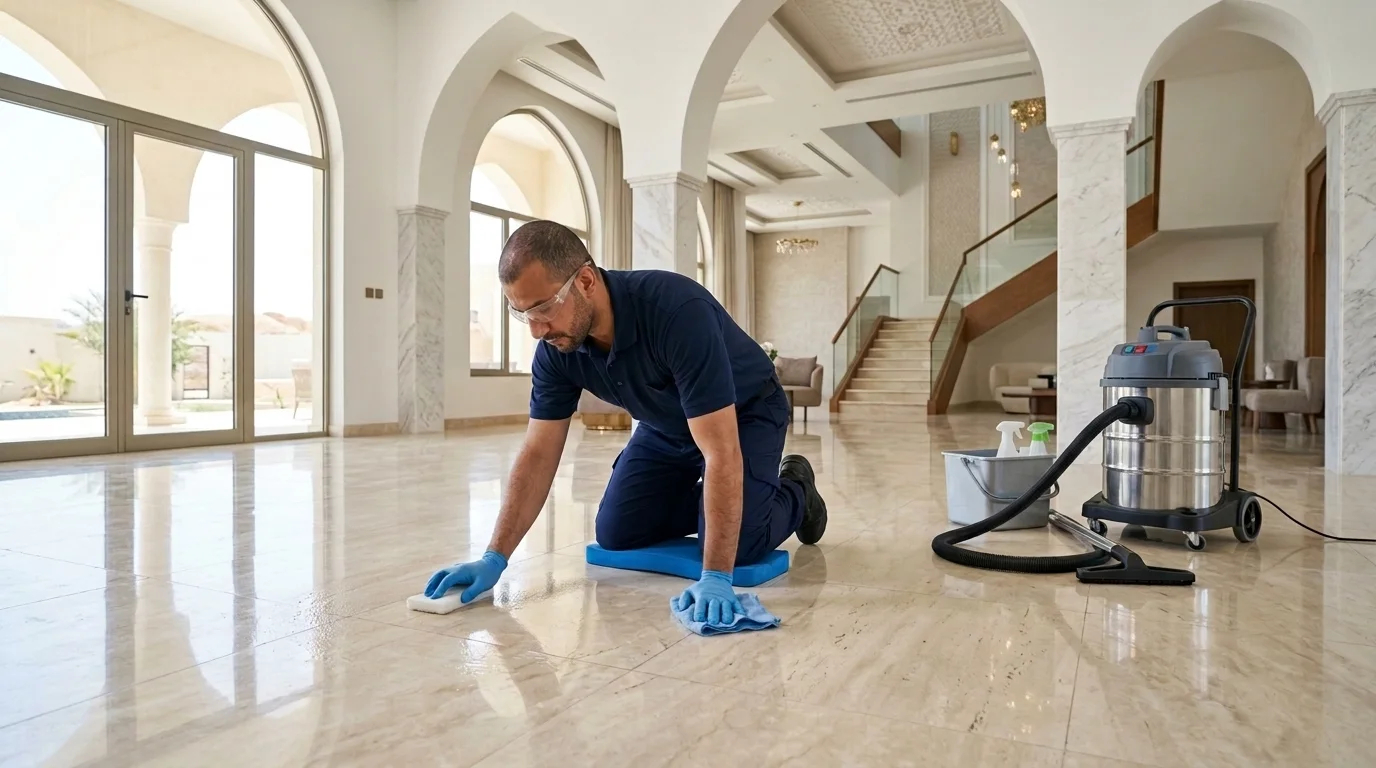
Post-construction marble and porcelain floor restoration using calibrated rotary scrubbing and wet-dry vacuum extraction in a new villa

Executive Summary — Key Takeaways in This Guide:

  • Natural marble, limestone, and travertine are calcium carbonate stones that dissolve and etch instantly upon contact with any acid—raw Flash, vinegar, and acidic grout cleaners must never touch them.
  • The chalky white film on new porcelain tiles is polymer-modified cement grout haze, which is insoluble in plain water and requires buffered descalers paired with rotary pad agitation.
  • Never flood loose gypsum plaster or cement dust with water before dry HEPA vacuuming; wet gypsum turns into a sticky paste that clogs tile micropores and solidifies inside drain traps.
  • Corrosive fumes released by raw acid in enclosed bathrooms oxidize and blacken chrome faucets, showerheads, and stainless steel drains even without direct liquid contact.
  • Sun-baked protective tapes on aluminum windows must be softened using controlled steam heat and citrus/aliphatic adhesive releasers—never scraped with metal utility blades.
Technical Analysis Matrix

Post-Construction Surface Compatibility & Residue Removal Matrix

A comparative engineering matrix detailing the chemical sensitivities and safe cleaning protocols for new residential surfaces.

Surface & Finish TypeComposition & Chemical SensitivityResult of Raw Acid or Improper ToolsCorrect Engineering Protocol
Natural Marble, Travertine & LimestonePorous calcium carbonate stone, extremely reactive to any acidic compound below pH 7.0.Immediate chemical effervescence (etching), permanent loss of polish, pitted pores, and yellowing iron oxidation.HEPA dry vacuuming, low-angle plastic/flexible blade lifting, stone-safe alkaline cleaners (pH 8–10), and diamond-pad honing/polishing if needed.
Polished & Nano-Glazed PorcelainHigh-density vitrified clay; resistant to mild chemistry, but its glossy glaze scratches under metal blades and traps micro-haze.Permanent hairline scratches from metal scrapers, eroded grout joints from raw acid, and persistent cloudy streaks from plain water mopping.Controlled application of buffered, corrosion-inhibited grout haze remover, soft white/red rotary pad agitation, and immediate wet-vacuum extraction.
Matte, Rustic & Anti-Slip PorcelainMicro-textured anti-slip topography that mechanically locks cement grout, polymer resins, and gypsum inside tiny surface valleys.Standard string mops shred against the rough texture and fail to reach into micro-valleys, leaving tiles permanently chalky and grey.Rotary nylon-bristle brush scrubbing paired with a polymer/cement haze emulsifier, followed by high-suction wet vacuuming to lift slurry from micro-pores.
Natural Granite & Basalt StoneDense igneous silicate stone; tougher than marble, but contains natural iron minerals that oxidize and rust when exposed to raw hydrochloric acid.Internal rusting/yellowing of light-colored granite slabs and disintegration of surrounding cementitious grout lines.Mechanical rotary scrubbing using neutral or granite-specific cleaners strictly free of hydrochloric/muriatic acid.
Stainless Steel Drains & Chrome FaucetsPrecision-plated metals protected by a micron-thin passive oxide film that breaks down rapidly upon contact with chloride gases and acid fumes.Blackening of chrome, peeling of matte-black/gold PVD finishes, and permanent brown rust pitting on new stainless drain grates.Masking and isolating drains and fixtures prior to floor work, cleaning them strictly with pH-neutral solutions and soft microfiber cloths.
Powder-Coated Aluminum Frames & GlassElectrostatic powder-coated aluminum and architectural glass that scratch easily if cement grit is dragged across the surface.Clouding or stripping of frame powder-coating by harsh paint thinners, and permanent glass scratches from dry blade scraping.Vacuuming frame tracks dry first, softening sun-baked stickers with steam and citrus-based releasers, and wet-lubricated glass detailing.

Field Diagnostic Checklist for Post-Construction & Renovation Residues

Diagnose the exact construction residue on your property to understand its behavior and safe removal method.

Indicator #1High (cures harder with each passing week)

Cloudy white film ("grout haze") that disappears when wet and returns as soon as porcelain dries

Root Cause: Microscopic film of cementitious minerals and polymer latex resin cured across tile pores after grouting.

Apply a buffered cement/polymer haze remover agitated with a single-disc rotary machine, followed by immediate wet-vac extraction instead of mopping.
Indicator #2Critical (physical surface erosion, not a removable stain)

Dull, rough, pale spots on natural marble where the mirror reflection has vanished

Root Cause: Chemical acid etching caused by acidic cleaners or raw acid dissolving the top calcium carbonate crystals of the marble.

Stop all chemical cleaning immediately; etching cannot be washed off and requires mechanical diamond-pad honing and re-polishing.
Indicator #3Medium (clogs plumbing if washed straight down drains)

Chalky white mounds of gypsum plaster and wall putty stuck to floors and baseboards

Root Cause: Hydrated calcium sulfate plaster and acrylic wall putty droppings accumulated during drywall and ceiling sanding.

Lift bulk mounds mechanically with non-marring scrapers, then dry-vacuum thoroughly with HEPA filtration prior to wet scrubbing.
Indicator #4Medium to High (high scratch risk if dry-scraped)

Paint splatters and overspray (water-based acrylic or oil-based enamel) on tiles, skirting, and glass

Root Cause: Painting and spraying performed without complete floor and window masking protection.

Soften paint droplets using a surface-matched eco-solvent, then lift with a lubricated, low-angle safety blade.
Indicator #5High (strips frame powder-coating if scraped aggressively)

Cracked, brittle protective tape baked onto aluminum window frames and glass

Root Cause: Leaving factory protective film exposed for months to intense UV radiation and heat, vulcanizing the adhesive into the frame coating.

Apply focused steam heat paired with a powder-coat-safe citrus/aliphatic adhesive releaser and lift with phenolic plastic blades.
Indicator #6Medium (must avoid pulling out the structural joint seal)

Cured translucent or white silicone smears around sinks, shower glass, and window perimeters

Root Cause: Smearing excess elastomeric sealant across adjacent tiles or glass during installation, leaving a rubbery film that traps dirt.

Score the outer smear edge cleanly and apply a specialized silicone digester gel to lift surface residue without compromising the joint seal.
In-Depth Technical Guide

Engineering & Technical Guide to Damage-Free Post-Construction Cleaning

Five technical modules detailing stone and porcelain chemistry, the hazards of raw acids, and proper mechanical handover protocols.

Module 1: Module 1: The Raw Acid & "Flash" Hazard

Why Raw Acid ("Flash") Permanently Destroys Natural Marble, Grout Joints, and Stainless Steel in Minutes

When untrained casual laborers encounter hardened cement splashes or grout residue after construction, they frequently reach for the cheapest, fastest-acting chemical available in grocery stores: raw, uninhibited hydrochloric/muriatic acid (locally known as "Flash"), which sits at an extreme pH of 0 to 1. Chemically, natural marble (such as Carrara, Crema Marfil, Oman marble, and Onyx), travertine, and limestone are composed primarily of calcite ($CaCO_3$ — calcium carbonate). The instant a single drop of acid touches natural marble, a violent chemical reaction dissolves the calcium crystals and releases carbon dioxide gas as visible fizzing.

The physical outcome of this reaction is irreversible "acid etching": the mirror-polished top layer of the stone is eaten away, leaving rough, chalky dull craters that no cleaner can ever wash off—because the damage is structural loss of stone rather than surface dirt, requiring expensive multi-stage diamond honing to restore. Even on acid-resistant porcelain tiles, pouring raw hydrochloric acid burns out the pigmented cementitious grout joints, turns them powdery and blotchy, and seeps through hairline gaps to weaken the underlying tile adhesive bed.

Even more insidious is the damage caused by airborne "acid fumes" inside enclosed bathrooms and kitchens. When raw acid is poured across a bathroom floor, invisible hydrogen chloride gas rises and condenses onto cooler metal fixtures—including basin mixers, rain showers, bidet sprayers, and stainless steel (grade 304/316) drain grates. Within hours, these chloride fumes strip the microscopic passive oxide layer protecting the metal, causing brand-new chrome, brushed nickel, or matte-black fixtures to turn black, pit, and develop brown rust spots within 48 hours without a single drop of liquid ever touching them.

Critical Facts About Raw Acid & Flash Damage

  • Natural marble and travertine are calcitic stones that dissolve and etch on contact with any strong or weak acid (even vinegar or lemon).
  • Acid-dull spots on marble are physical surface erosion (etching) that cannot be washed away and require mechanical diamond polishing.
  • On porcelain floors, raw acid burns, bleaches, and crumbles the cementitious grout joints between tiles.
  • Airborne acid fumes inside bathrooms corrode and blacken chrome faucets and stainless steel drains without direct contact.
  • The safe engineering alternative for porcelain only is using buffered, fume-inhibited descalers at strictly controlled dilutions.
Field Specialist Pro-Tip:

Pro Tip: Before allowing any cleaning crew onto your new property, explicitly prohibit raw "Flash" or hydrochloric acid bottles on-site, and ensure all faucets and drain covers are masked during floor scrubbing.

Important Safety Caution:

Caution: Many modern surfaces are engineered marble agglomerates or cement terrazzo; because they contain crushed marble and cement binders, acids will etch them just like natural stone.

Module 2: Module 2: Porcelain Grout Haze Resolution

Solving "Cloudy Porcelain" and White Polymer Grout Haze After Tile Installation

One of the most frequent complaints from owners of newly tiled villas and apartments in Jeddah and Makkah—especially those with large-format 60×120 cm or 120×240 cm polished or matte porcelain slabs—is that the floor looks rich and clean while wet with mop water, yet dries ten minutes later into a dull, chalky white or grey haze that shows every footprint. Many homeowners assume this is ordinary construction dust that will vanish after a few moppings with floor soap, but the underlying chemistry tells a different story.

Modern tile grouts used across Saudi construction projects are no longer simple white Portland cement; they are fortified with synthetic latex polymers (polymer-modified cementitious grout) or epoxy resins engineered for water resistance and bond strength. When tile installers sponge off excess grout during installation without changing rinse water frequently enough, a microscopic film of polymer resin and fine cement silicates cures inside the microscopic pores of the porcelain surface. Once cured, this polymer-cement haze is completely insoluble in water and standard household detergents.

Permanent removal without damaging grout lines requires a precise mechanical-chemical cycle: first identifying whether the haze is polymer-cement or epoxy; second, applying a buffered haze-dissolving agent formulated to break the polymer-mineral bond; third, agitating the surface evenly with a low-speed single-disc rotary machine fitted with a non-abrasive pad or nylon brush; and finally, vacuuming the suspended slurry straight off the floor with an industrial wet extractor—since hand mopping simply spreads the dissolved haze back across the tiles.

Secrets to Eliminating Porcelain Grout Haze

  • Cloudy film on new porcelain is cured polymer-latex and cement grout haze, not ordinary dust.
  • Hand mopping with water merely redistributes suspended grout solids across the room without lifting them.
  • Matte, wood-look, and anti-slip porcelain traps haze in deep micro-valleys and requires rotary bristle brushes rather than flat pads.
  • Immediate wet-vacuum extraction after mechanical scrubbing is the decisive step that stops haze from re-depositing.
  • Epoxy grout haze is completely unaffected by acidic cleaners and requires a dedicated epoxy-stripping gel.
Field Specialist Pro-Tip:

Pro Tip: To test whether dull porcelain is suffering from grout haze versus factory glaze defects, scrub a small corner tile with a diluted buffered grout haze remover, rinse, and wipe bone-dry with a clean microfiber towel; if deep color and clarity return, the haze is 100% removable.

Important Safety Caution:

Caution: Always pre-wet cementitious grout joints with clean water before applying any haze remover onto porcelain tiles; water-saturated grout lines resist chemical absorption, protecting joint integrity and color.

Module 3: Module 3: Gypsum & Fine Dust Extraction

Why Gypsum Plaster and Cement Dust Must Be Dry-Extracted (HEPA) Before Using a Single Drop of Water

Following gypsum ceiling installations, drywall putty sanding, and on-site tile cutting, every horizontal and vertical surface in a new property—from recessed ceiling coves and wall moldings to window tracks and floors—is blanketed in ultra-fine white and grey mineral powder. A costly mistake made by untrained crews is immediately unrolling water hoses and washing this thick powder layer straight across the floors toward bathroom and kitchen drains.

From an engineering standpoint, gypsum plaster and Portland cement are hydraulic powders designed to react with water and harden into a dense paste. Flooding dry construction dust with water triggers two severe problems: first, the resulting milky slurry penetrates deep into micro-pores and freshly laid colored grout joints (turning charcoal, grey, or beige grout lines chalky white); second, the heavy gypsum-cement sludge flows into floor drain P-traps where it settles at the bottom of the pipe bend and solidifies like stone, causing severe plumbing blockages before the family even moves in.

Consequently, professional post-construction cleaning always begins with a strict top-down "Dry Extraction Phase": crusted mounds of plaster and joint compound are first lifted dry using flat safety scrapers, followed by high-powered industrial vacuuming equipped with multi-stage HEPA filtration to capture 95%+ of loose dust from coves, walls, cabinetry, window tracks, and floors. Wet scrubbing only begins once free mineral powder has been completely evacuated from the site.

Rules for Handling Gypsum & Sanding Dust

  • Gypsum and cement dust turn into a sticky hydraulic paste when wetted, clogging tile pores and solidifying inside plumbing traps.
  • Top-down industrial HEPA dry vacuuming removes over 95% of particulate dust before any water touches the floor.
  • Hidden ceiling light coves and AC vents must be vacuumed dry first so settled dust does not rain down onto freshly washed floors.
  • Lifting dried plaster mounds while dry is ten times cleaner and faster than scrubbing them after they turn into mud.
  • Protecting floor drain openings during construction cleanup prevents gravel and mortar debris from entering the plumbing.
Field Specialist Pro-Tip:

Pro Tip: When inspecting a post-construction cleanup, run your fingers inside the recessed gypsum ceiling cove or along the top edge of wooden door frames; if your hand comes back white with sanding dust, the crew only washed the floors and dust will rain onto your furniture as soon as the AC turns on.

Important Safety Caution:

Caution: Standard household vacuum cleaners burn out their motors rapidly when vacuuming fine gypsum or cement dust because micron-sized particles bypass standard bags and abrade motor bearings; industrial fine-dust extractors are required.

Module 4: Module 4: Paint, Silicone & Window Detailing

Scratch-Free Engineering Removal of Paint Splatters, Cured Silicone, and Sun-Baked Window Stickers

True post-construction readiness goes far beyond floor washing; it is defined by precision architectural detailing—removing paint overspray from skirting boards, light switches, and floors; clearing mortar grit from sliding window tracks; stripping cured silicone smears; and peeling factory protective tapes off aluminum frames. Under the intense solar radiation and summer heat of Jeddah and Makkah, protective plastic tapes left on powder-coated or anodized aluminum frames for months during construction undergo UV degradation: the outer film turns brittle and cracks into tiny flakes while the underlying acrylic adhesive vulcanizes and bonds onto the frame coating.

If a worker attacks sun-baked window tape with a metal utility knife, steel wool, or aggressive lacquer thinner, the powder coating is instantly scratched or chemically dulled. Safe engineering removal combines focused thermal conditioning (using a commercial steam nozzle to re-soften the brittle film and adhesive polymer) with powder-coat-safe citrus terpene or purified aliphatic adhesive releasers, lifting the softened residue cleanly with non-marring phenolic plastic blades.

Similarly, when detailing large architectural glass panes speckled with paint, stucco, and silicone, running a metal scraper across dry or dusty glass is strictly forbidden. Microscopic quartz sand, cement grit, and microscopic fabrication nodules on tempered glass will score permanent scratches if scraped carelessly. Proper glass detailing begins with flushing away all abrasive dust, softening paint and silicone spots chemically, lubricating the pane generously with a high-slip surfactant solution, and using fresh stainless steel blades held strictly at a low 30-degree forward angle.

Standards for Scratch-Free Paint & Sticker Removal

  • Sun-baked aluminum frame stickers must be softened with steam heat and powder-coat-safe adhesive releasers, never metal blades.
  • Harsh paint thinners and acetone strip window frame paint and degrade EPDM rubber weatherstripping gaskets.
  • Sliding window tracks must be dry-vacuumed of mortar pebbles and grit before wet washing so rollers glide smoothly.
  • Never scrape glass or polished porcelain dry; always pre-soften splatters and lubricate the surface with a high-slip solution.
  • Cured silicone smears around sanitary ware are lifted using a silicone-digesting gel while preserving the structural joint bead.
Field Specialist Pro-Tip:

Pro Tip: During construction or renovation, instruct your contractor to peel protective aluminum tapes off immediately after plastering and painting conclude rather than leaving them in the sun for months.

Important Safety Caution:

Caution: Tempered architectural glass and coated low-E double glazing are highly scratch-sensitive; using rusty blades or scraping at steep angles leaves permanent score lines visible in direct sunlight.

Module 5: Module 5: Neutralization, Sealing & Handover

The Final Stage: pH Neutralization, Surface Buffing, and Marble Sealing Before Move-In

Once cement splatters, grout haze, gypsum dust, and paint droplets have been removed from floors, bathrooms, and kitchens, a critical engineering step remains to prevent recurring dullness or chemical residue buildup: the "pH Neutralization Rinse." Whenever buffered acidic descalers have been used on porcelain or alkaline heavy-duty strippers have been applied to stone, leaving residual chemistry inside micropores or grout joints will continue reacting slowly and attract soil as soon as the family moves in.

During the final neutralization phase, all hard floors are flushed with clean water conditioned to return the surface to a neutral pH of 7.0, extracted dry with vacuum squeegees, and buffed with clean microfiber pads to prevent mineral water spots on dark or high-gloss porcelain slabs. Simultaneously, kitchen and wardrobe interiors are vacuumed and wiped sanitized, bathroom walls are washed ceiling-to-floor, and glass, mirrors, and chrome fixtures are polished streak-free.

For villas and apartments featuring natural marble, travertine, or porous stone floors, vanities, and countertops, the window immediately after post-construction cleaning—when the stone pores are 100% clean and bone-dry prior to furniture delivery—is the optimal moment to apply a penetrating impregnating sealer. This breathable sub-surface sealer lines the internal stone capillaries without altering surface appearance, giving homeowners vital reaction time to wipe up future coffee, juice, or oil spills before they stain the stone.

Final Handover Inspection Checklist

  • Neutralizing rinse cycles (pH 7.0) halt residual chemical activity in grout lines and prevent sticky floor films.
  • Porcelain floors must be inspected bone-dry under angled lighting to verify 100% elimination of grout haze.
  • Applying a penetrating stone sealer to clean, dry marble protects it against coffee and oil stains after move-in.
  • Detailing window tracks, door hinges, electrical switches, and cabinet interiors is integral to true handover cleaning.
  • Verifying free water flow across all floor drains and spotless stainless grates completes the handover protocol.
Field Specialist Pro-Tip:

Pro Tip: Always schedule your final post-construction cleaning only after the very last trade contractor (painters, carpenters, electricians, and kitchen installers) has completely exited the property; a single technician drilling ceilings or cutting wood afterward will re-coat the entire home in fine dust.

Important Safety Caution:

Caution: Never cover freshly washed natural marble floors with non-breathable plastic sheeting while residual moisture remains in the stone slab; trapped moisture triggers dark water staining and mineral efflorescence.

Hyperlocal City Adaptation

Field Adaptation for Post-Construction Cleaning Across Jeddah & Makkah Projects

How architectural trends and climate conditions across Jeddah and Makkah districts influence marble, porcelain, and window restoration.

Jeddah GovernorateJeddah Sectors Hub

Jeddah Projects Context: Large-Format Porcelain Slabs, Curtain Glass, and Humid Salt Air

Newly built duplexes, standalone villas, and luxury apartments in Jeddah heavily feature large-format porcelain slabs (120×120 cm and 120×240 cm) in matte stone or high-gloss finishes, paired with expansive floor-to-ceiling glass facades and dark powder-coated aluminum profiles. In Jeddah’s humid coastal air, airborne gypsum and cement dust combine with ambient moisture and sea salts to form a tenacious crust across glass and tile surfaces that simple water rinsing cannot dislodge.

Additionally, leaving windows open during months of interior finishing in coastal Jeddah exposes newly installed bathroom mixers, hinges, and window tracks to humid salt air. Our Jeddah post-construction protocol therefore prioritizes deep dry HEPA extraction, rotary brush emulsification of polymer grout haze on textured porcelain, and protective detailing of metallic fixtures and architectural glass.

  • North Jeddah & Obhur (North/South Obhur, Al-Shati, Al-Murjan, Al-Basateen): High-end contemporary villas combining natural marble foyers with large-format porcelain slabs and panoramic glass facades requiring strict stone-safe separation.
  • Central & West Jeddah (Al-Rawdah, Al-Zahra, Al-Salamah, Al-Naeem, Al-Nahdah): Luxury ownership apartments and major renovations frequently requiring polymer grout haze removal and bathroom/kitchen silicone detailing.
  • East Jeddah & Growth Corridors (Al-Hamdaniyah, Al-Samer, Al-Manar, Al-Falah, Taibah): Rapidly developing residential zones with heavy construction dust and sun-baked window frame stickers requiring steam and rotary extraction.
  • South Jeddah (Al-Ajaweed, Al-Sanabel, Prince Fawaz): Spacious family villas and housing projects needing comprehensive foundational scrubbing across interiors, staircases, courtyards, and tanks prior to move-in.

Makkah Projects Context: Natural Stone Work, Mountain Dust, and High Thermal Exposure

Residential architecture in Makkah places strong emphasis on natural marble and granite across grand staircases, foyers, courtyards, and majlis floors, alongside patterned porcelain tiles in living areas. Because of Makkah’s rocky, mountainous terrain and ongoing rock-cutting across residential subdivisions, dust accumulating inside construction sites contains sharp quartz and silica particles that act like sandpaper if dragged across polished marble or glass.

Moreover, Makkah’s intense summer heat causes polymer-modified tile grout to flash-dry onto porcelain surfaces before installers can sponge it clean, while rapidly baking protective tapes onto window frames. Consequently, our Makkah protocol begins with complete dry HEPA removal of abrasive mineral grit, followed by controlled mechanical-chemical grout haze emulsification and stone-safe marble care.

  • Southern & Western Makkah (Al-Shawqiyyah, Al-Kakiyyah, Batha Quraish, Wali Al-Ahd): Rapidly expanding apartment and villa districts frequently requiring polymer grout haze removal on porcelain and baked sticker detailing.
  • Eastern Makkah (Al-Awali, Al-Naseem, Al-Shara’i, Al-Rashidiyah): Distinguished villas featuring expansive natural marble and granite staircases and foyers that demand 100% acid-free cleaning and stone protection.
  • Central Makkah & Al-Aziziyah (Al-Aziziyah, Al-Khalidiyah, Al-Zahir, Al-Rusaifah): Newly finished or renovated residential and hospitality units requiring fast, fixture-safe bathroom and floor restoration.
  • Northern Makkah (Al-Taneem, Al-Nawariyah, Al-Umrah, Al-Buhairat): Developing residential subdivisions with heavy mineral rock dust and gypsum debris requiring industrial dry extraction prior to wet scrubbing.
Illustrative Service Scenario — For Educational Reference

Post-Construction Handover of a New Duplex Villa Featuring a Natural Marble Foyer and Matte Porcelain Halls

Property Context & Initial Challenge:

A newly completed vacant two-story duplex villa with a rooftop annex; the main foyer and staircase feature polished Crema Marfil natural marble, while living halls and bedrooms use 60×120 cm warm-grey matte porcelain slabs with black powder-coated aluminum windows.

Heavy white polymer grout haze covered the grey matte porcelain halls despite workers washing them three times with water; gypsum plaster mounds and white acrylic paint splatters dotted the natural marble staircase; and protective tapes had baked onto the black aluminum window frames for 6 months in direct sun.

Outcome & Long-Term Prevention:

The chalky white haze vanished completely from the matte porcelain, revealing its true warm-grey tone; the marble staircase retained its mirror polish without a single scratch or acid etch; and the black window frames and bathroom fixtures were delivered spotless and move-in ready.

Diagnostic Inspection Findings:

  • Inspection of the matte porcelain revealed that its anti-slip micro-valleys were packed with cured polymer-modified grout haze that flat mops glided right over without reaching.
  • Testing the staircase confirmed calcitic Crema Marfil marble; applying any acidic cement remover to clean the plaster droppings would have instantly etched the stone polish.
  • Recessed ceiling light coves and sliding window tracks held thick layers of dry gypsum sanding powder and mortar grit.
  • The protective film on the black aluminum frames was brittle and UV-vulcanized; metal blades would have scarred the matte black powder coating.

Technical Protocol Applied:

  • Step 1 (Isolation & Dry HEPA Extraction): Masking the marble staircase and stainless floor drains, followed by top-down industrial HEPA dry vacuuming of ceiling coves, walls, window tracks, and floors.
  • Step 2 (Matte Porcelain Restoration): Pre-wetting grout joints with clean water, applying a buffered polymer-haze remover strictly to the porcelain halls, agitating with a rotary nylon-bristle brush to reach micro-pores, and extracting the slurry immediately with a wet vacuum.
  • Step 3 (Natural Marble Care): Lifting gypsum mounds and paint droplets from the marble staircase using lubricated plastic blades and an acid-free stone cleaner (pH 8.5), followed by soft pad buffing.
  • Step 4 (Window Detailing & Final Neutralization): Softening baked aluminum frame stickers with steam and citrus adhesive releaser using phenolic plastic scrapers, then performing a facility-wide pH 7.0 neutralizing rinse and dry buff.
Safe Decision Boundaries

When Light Touch-Ups Are Safe vs. When You Need a Post-Construction Specialist Crew

Clear criteria to help you protect your new property finishes from costly handover mistakes.

Light Tasks You Can Safely Handle Yourself

  • Removing light dust after installing a single curtain rod or furniture piece using a vacuum and damp microfiber cloth.
  • Peeling brand-new window or appliance stickers (not yet exposed to sun) by pulling slowly at a 45-degree angle while warming gently with a hairdryer.
  • Wiping tiny drops of fresh water-based wall paint (before it cures hard) using a warm damp microfiber cloth and neutral soap.
  • Wiping light dust inside new wardrobe shelves after verifying all coarse wood shavings and screws have been vacuumed.
  • Buffing dusty mirrors and new bathroom faucets (free of cement or grout) with a clean microfiber towel and water.

Scenarios Requiring a Professional Post-Construction Crew & Machinery

  • Handover of a newly built or fully renovated villa or apartment containing widespread gypsum dust, mortar splashes, and paint overspray.
  • Persistent chalky white polymer grout haze across matte, textured, or polished porcelain floors that returns after mopping.
  • Plaster, paint, or adhesive residues sitting on acid-sensitive natural marble, travertine, or limestone floors and staircases.
  • Sun-baked, cracked protective tapes bonded onto powder-coated aluminum window frames and glass facades.
  • Heavy grout, silicone, and mortar buildup inside newly tiled bathrooms around chrome/matte-black fixtures and stainless steel drains.

Transparent Scope Note: Professional post-construction cleaning safely removes all contractor residues (grout haze, gypsum, paint, silicone, and baked stickers) to restore factory finishes, but cannot reverse manufacturing glaze defects or prior chemical burns if raw acid/Flash was poured onto marble or chrome fixtures before our arrival (acid-etched marble requires mechanical diamond honing).

Frequently Asked Questions

Frequently Asked Questions About Post-Construction Marble & Porcelain Cleaning

Clear engineering answers to the top questions asked by owners of new villas and apartments in Jeddah and Makkah.

Why do new porcelain tiles stay cloudy and chalky even after mopping several times with water and soap?+

Because the white film is not loose dust—it is cured polymer-modified cement grout haze locked inside microscopic surface pores. It does not dissolve in water or regular floor soap and requires a buffered haze remover, rotary mechanical scrubbing, and immediate wet-vacuum extraction.

Is it safe to use raw acid or Flash cleaner on marble or in bathrooms if diluted with water?+

Absolutely not. Natural marble and travertine chemically etch even when exposed to diluted acids, and hydrochloric acid fumes inside bathrooms oxidize and blacken chrome faucets, stainless steel drains, and cementitious grout joints.

How is matte, anti-slip, or wood-look porcelain cleaned of cement and grout without damaging the texture?+

Matte and anti-slip porcelain features micro-valleys that trap grout. We use a rotary scrubbing machine fitted with flexible nylon bristles that reach deep into surface contours alongside a buffered emulsifier, followed by high-suction wet vacuuming.

When is the right time to schedule post-construction cleaning for a new villa or apartment?+

The ideal time is after all trade contractors (painters, plasterers, electricians, plumbers, aluminum installers, and kitchen/door carpenters) have completely finished and exited, and 2–3 days before furniture delivery—with electricity and water active on-site.

How do you remove protective window frame stickers that have baked in the sun for months?+

We use a dual thermal-chemical method: applying focused steam heat to re-soften the brittle plastic film and adhesive, pairing it with a powder-coat-safe citrus/aliphatic adhesive releaser, and lifting it with non-marring phenolic plastic scrapers.

A previous worker washed our marble with Flash acid and it turned dull and rough—will washing restore its shine?+

Dullness caused by Flash or acid on natural marble is physical "acid etching" where the polished calcium layer was dissolved, not surface dirt. Washing cannot restore the shine; it requires mechanical honing and polishing with diamond abrasives.

Does post-construction cleaning cover cabinets, staircases, windows, and bathrooms, or just the floors?+

Comprehensive post-construction handover cleaning covers the property top-to-bottom: vacuuming ceiling coves, walls, aluminum window frames/tracks and glass, doors, kitchen and wardrobe interiors/exteriors, full bathroom detailing, staircases, and all floors and courtyards.

Unified Service Request Builder

Share Your Request Details for Scheduling & Transparent Pricing

Enter your basic contact details, select your city (Jeddah or Makkah), and choose the service you need. This form organizes your inquiry for immediate coordination.

We respect your privacy. Your information is used strictly to respond to your service inquiry.
CallWhatsAppGet Quote